So today I wanted to do something relatively cool(!!) with things that I had around me. There are a lot of examples out there that sends input values from Arduino to Processing and then draw something cool. I wanted to do something a bit cooler and as always I wanted to bring Javascript into the action. In this tutorial i’m showing you how I connected my Arduino to a local NodeJS server and with the use of SocketIO send the value of potentiometer to client side and draw a cool graph with ProcessingJS !!!
Arduino
We begin with setting up the Arduino board and program it to write the value of potentiometer into serial port.
I used following schematic to set wire up my board to potentiometer:

Now using the following code, we read the value of potentiometer
1 2 3 4 5 6 7 8 9 10 11 12 13 | |
Note that I mapped our analog value of potentiometer, which is between 0 to 1023, to a number between 0 to 90. It’s because we need our value to be in that range so our processing example would draw correctly.
Server
Our server needs to have access to the same serial port that the Arduino is connected to read the value and send it to the client using SocketIO.
This node server also uses ExpressJS to serve the static files.
My Arduino is connected to /dev/tty.usbmodem1421 . In Arduino app if you go to tools/serial port the one that has check next to it is the port that your Arduino board is connected. Windows users your port would start with COM.
1 2 3 4 5 6 7 8 9 10 11 12 13 14 15 16 17 18 19 20 21 22 23 24 25 26 27 28 29 30 | |
Keep that in mind that Arduino constantly reads the value of potentiometer and writes it into the serial. If we emit every single value that comes into the serial port app would be slow. That’s why we keep the value from serial port in lastValue and check it each time and if it changed we’re going to emit the value to the client.
Client Side
In our browser script.js, we’re listening for data event on socket and we’re going to show the value on the screen as well as assigning it to our angle variable.
1 2 3 4 5 6 7 8 9 10 11 12 | |
pretty easy right?
ProcessingJS
I’m not an expert in Processing but good news is i’ve started learning more about Processing language and trying to make some cool stuff with it. So I found this example in ProcessingJS website which I thinks it’s perfect for this little project(it exactly gives you that feeling that something is changing as you play with the potentiometer).
Link to the example on ProcessingJS website
After including the ProcessingJS to our HTML page, like below we load our tree.pde, which is a processing file into our app and ProcessingJS will compile and draw it for us into our canvas. You just have to give the path of the file in your filesystem relative to the index.html file.
1
| |
The only difference of this tree.pde and actual code on the ProcessingJS website is that in the actual code, they generate the angle from position of you mouse on the canvas. However in our example we get the angle from our Arduino. The cool thing about ProcessingJS is that because it compiles processing code into Javascript, then you are allowed to write Javascript inside your processing code and you have access to all the Javascript functions and variables. That’s why we can directly replace the float a = (mouseX / (float) width) * 90f; in the actual code with float a = angle; which angle is a global variable and it’s value changes everytime our client code receives new value form server.
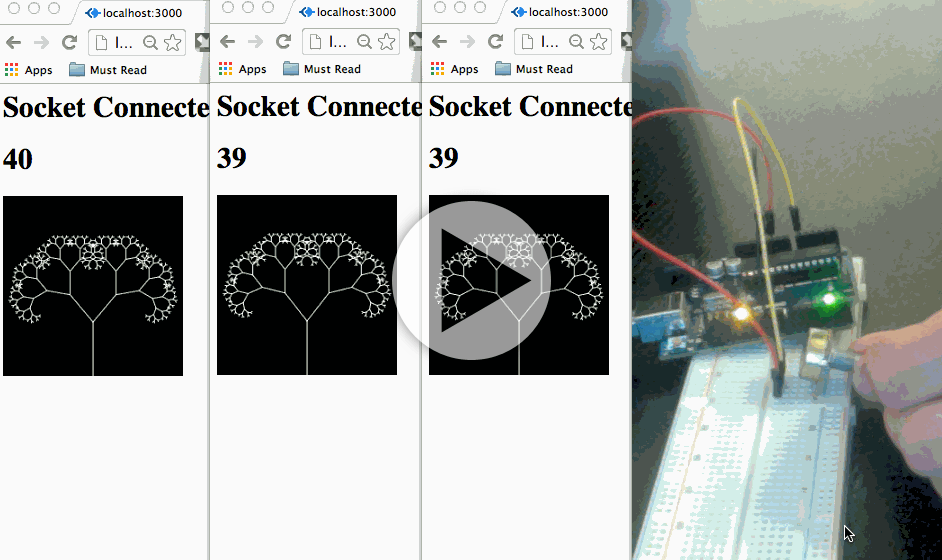
Result
Here is a gif of the result. As you can see I have tree windows open and they are all sync together because of the realtime communication of client and server using SocketIO.
The source code of this project is available HERE on github.
Make sure to run npm install && bower install to install all the dependencies.
Connect your Arduino board to the same port that you set in your app.js and then run npm start and head over to localhost:3000 to see the magic !!!
Hope you guys enjoyed it !! If you had any question use comments below or send me your questions at dani_khosravi@yahoo.com. Also follow me on twitter if your interested in Arduino, Javascript and these sort of goodies :D